
You need to accept payments on your WordPress site. Maybe it is a one-off service fee, a consultation booking, a donation button, or a membership subscription. The obvious answer is WooCommerce – but do you really need an entire e-commerce platform just to collect a payment?
If the answer is no, Stripe gives you a cleaner option. This guide walks through how to add Stripe payments to WordPress without WooCommerce – covering plugins, custom integration, recurring payments, and the security considerations that matter.
Why Skip WooCommerce for Stripe Payments?
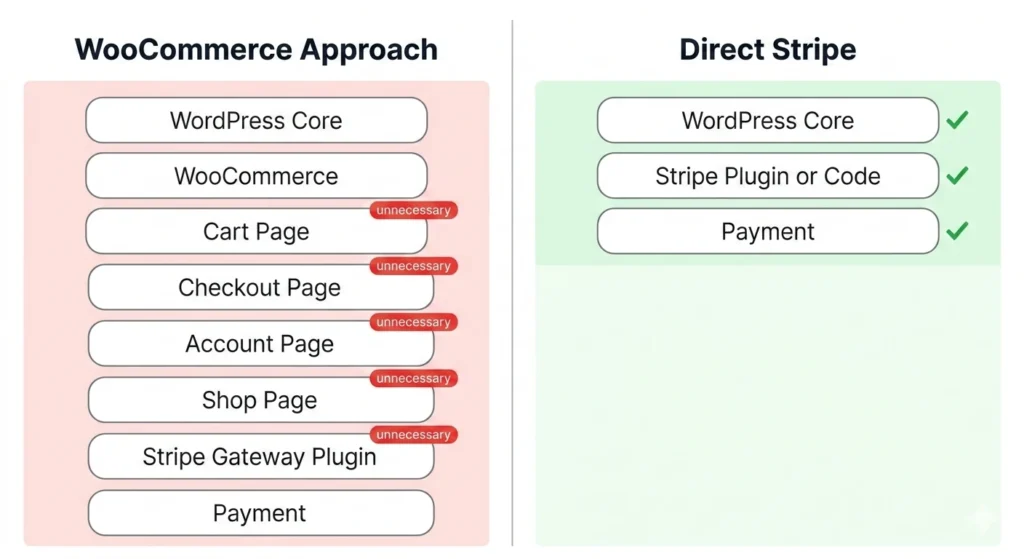
WooCommerce is excellent for running an online store. But if you are not selling physical products or managing inventory, it adds unnecessary complexity:
- Overhead – WooCommerce loads cart, checkout, account, and shop pages you will never use
- Performance – extra database tables, scripts, and styles slow your site down
- Maintenance – more plugins to update, more potential conflicts, more things to break
- Complexity – your client just wants a “Pay Now” button, not a full storefront
For service businesses, agencies, consultants, membership sites, and donation-based organisations, connecting Stripe directly to WordPress is faster, lighter, and easier to maintain.

What You Need Before Starting
Before adding Stripe to your WordPress site, make sure you have:
- A Stripe account – sign up at stripe.com. Verification takes minutes for basic accounts.
- SSL certificate – your site must run on HTTPS. Every reputable host provides this free via Let’s Encrypt. Stripe will reject connections from non-HTTPS sites.
- Your Stripe API keys – found in the Stripe Dashboard under Developers > API Keys. You will need both the publishable key (starts with pk_) and the secret key (starts with sk_).
- A WordPress site you control – you need plugin installation access or the ability to edit theme files for custom integrations.
Test mode first. Stripe provides separate test API keys. Always build and test with these before switching to live keys.
Method 1: Using WP Simple Pay (Best for Most Sites)
WP Simple Pay is purpose-built for exactly this use case – Stripe payments on WordPress without WooCommerce.
Step-by-Step Setup
- Install the plugin – search for “WP Simple Pay” in Plugins > Add New. The free version handles one-time payments. The Pro version adds recurring payments, custom fields, and payment forms.
- Connect your Stripe account – go to WP Simple Pay > Settings > Stripe. Click “Connect with Stripe” and authorise. This uses Stripe Connect, so your secret key is never stored in WordPress.
- Create a payment form – go to WP Simple Pay > Add New. Choose a template or start from scratch.
- Configure the form – set the payment amount (fixed or user-defined), add a description for the Stripe receipt, choose payment methods (card, Apple Pay, Google Pay), and set success/failure redirect URLs.
- Embed the form – use the shortcode or block to place the form on any page or post.
When to Use WP Simple Pay
- One-time payments for services or consultations
- Donation collection with custom amounts
- Simple subscription or membership fees
- Event registration payments
- Invoice payment links
Method 2: Using Stripe Payment Links
If you want zero plugins, Stripe’s own Payment Links feature works directly from the Stripe Dashboard.
How It Works
- Create a Payment Link in your Stripe Dashboard under Payment Links
- Set the product name, price, and options (one-time or recurring)
- Copy the link and add it as a button or hyperlink on your WordPress page
This is the simplest possible approach. No plugin, no configuration, no maintenance. The customer clicks the link, gets taken to a Stripe-hosted checkout page, pays, and gets redirected back.
The trade-off: the checkout happens on Stripe’s domain, not yours. You lose some branding control, but you gain simplicity and guaranteed PCI compliance.
Making It Look Professional
Use the WordPress button block to create a styled “Pay Now” button that links to your Stripe Payment Link. Match the button colour to your brand – your client will never know the checkout is hosted elsewhere.
Method 3: Stripe Elements (Custom Integration)
For developers or agencies building custom WordPress sites, Stripe Elements gives you full control over the payment experience without leaving your site.
What Stripe Elements Provides
- Prebuilt, secure input fields for card number, expiry, and CVC
- Automatic formatting, validation, and error handling
- Full visual customisation to match your site design
- PCI compliance handled by Stripe (card data never touches your server)
Implementation Overview
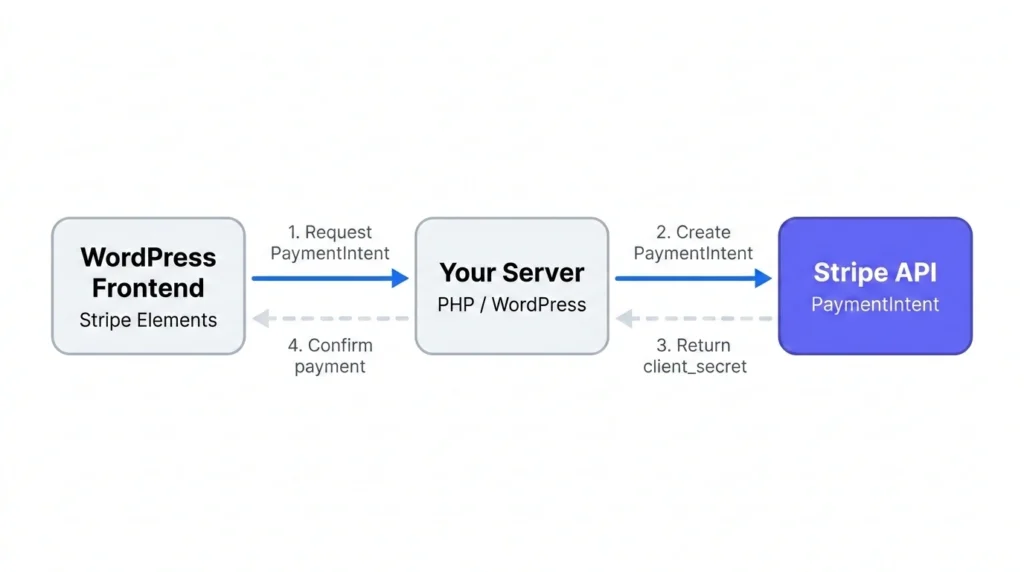
This approach requires custom code. Here is the high-level process:
- Enqueue the Stripe.js library in your theme or plugin
- Create a payment form with a mount point for Stripe Elements
- Initialise Stripe Elements with your publishable key
- Handle the form submission – create a PaymentIntent on your server using the Stripe PHP SDK
- Confirm the payment client-side using the PaymentIntent client secret
When Custom Integration Makes Sense
- You need a payment form that matches your site pixel-perfectly
- You are building a bespoke WordPress application
- Your client has specific UX requirements for the payment flow
- You need to capture additional data alongside the payment
At Devash, we have built custom Stripe integrations for clients like Football Exams – where the payment flow is tightly coupled with a credit-based exam system. Our Smart Coach plugin handles exactly this: Stripe payments powering a credit system without any WooCommerce dependency.
Method 4: Gravity Forms + Stripe Add-On
If your site already uses Gravity Forms (or you need complex forms with conditional logic), the Stripe add-on is a clean solution.
Setup Process
- Install Gravity Forms (requires a licence) and the Stripe Add-On
- Connect your Stripe account via the add-on settings
- Create a form with your required fields
- Add a Credit Card field (Stripe Elements-powered)
- Configure the Stripe feed – map form fields to Stripe payment data
This approach works well when the payment is part of a larger form submission – booking requests, applications, registration forms with optional payments.
Setting Up Recurring Payments Without WooCommerce
Recurring payments (subscriptions) through Stripe without WooCommerce are straightforward with the right approach.
Option 1: WP Simple Pay Pro
The Pro version supports recurring payments directly. Set the billing interval (weekly, monthly, yearly) and WP Simple Pay handles creating and managing Stripe subscriptions.
Option 2: Stripe Payment Links
When creating a Payment Link, choose “Recurring” instead of “One-time.” Stripe manages the entire subscription lifecycle – billing, retries, cancellation.
Option 3: Custom Implementation
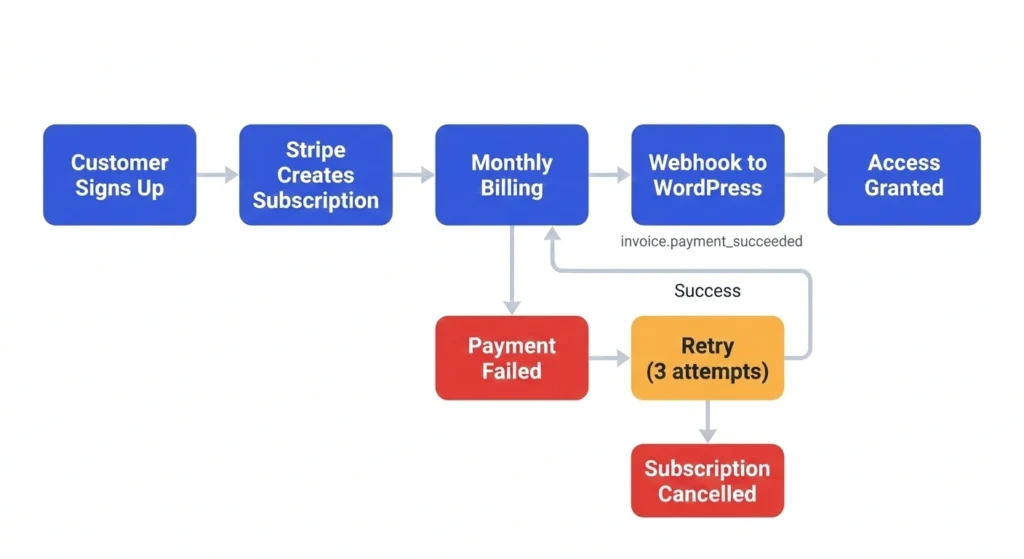
Use the Stripe Subscriptions API:
- Create a Product and Price in Stripe
- Create a Customer when they first pay
- Create a Subscription linking the Customer to the Price
- Handle webhooks for payment success, failure, and cancellation
Webhook handling is critical for recurring payments. Set up a webhook endpoint on your WordPress site that listens for events like invoice.payment_succeeded, invoice.payment_failed, and customer.subscription.deleted.
Security Best Practices
Accepting payments means handling sensitive data. Here is what you must get right:
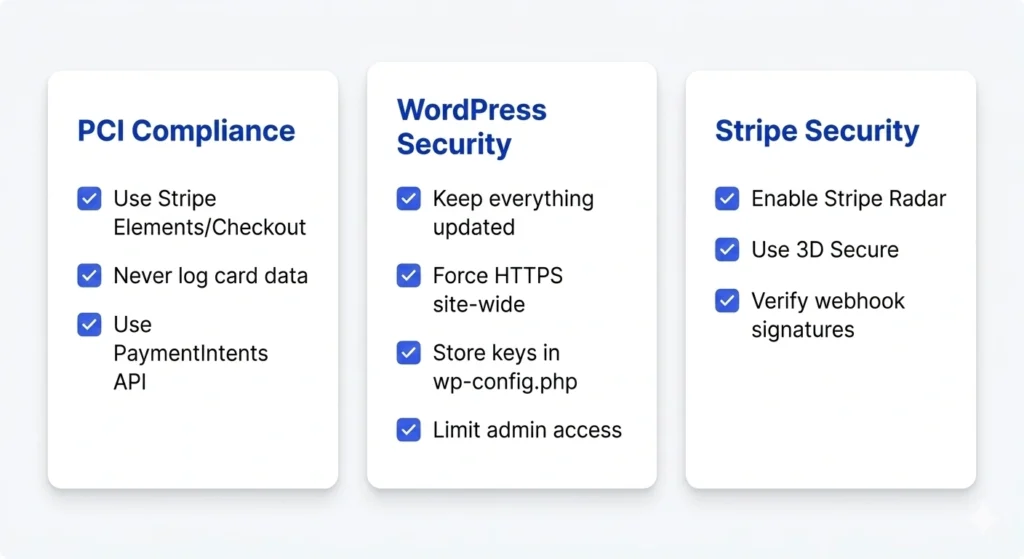
PCI Compliance
- Use Stripe Elements or Checkout – card details are entered directly into Stripe’s secure iframes. Your server never sees the card number.
- Never log card data – if you are building custom, never store or log any card information on your server.
- Use PaymentIntents – the modern Stripe API. Older approaches like Charges are deprecated and less secure.
WordPress Security
- Keep everything updated – WordPress core, plugins, themes. Outdated software is the number one attack vector.
- Use HTTPS everywhere – not just on payment pages. Force HTTPS site-wide.
- Protect your API keys – store your Stripe secret key in wp-config.php, not in the database or a settings page that could be exposed.
- Limit admin access – only give admin access to people who need it. Use the principle of least privilege.
Stripe-Specific Security
- Enable Stripe Radar – Stripe’s built-in fraud detection. It is free and catches most fraudulent transactions.
- Set up 3D Secure – Stripe handles this automatically with PaymentIntents. It adds an extra authentication step for high-risk transactions.
- Use webhook signatures – always verify that webhook events actually came from Stripe using the webhook signing secret.
Testing Your Payment Integration
Before going live, test thoroughly:
- Use Stripe test mode – all plugins and custom integrations should support switching between test and live keys
- Test with Stripe’s test card numbers – 4242 4242 4242 4242 (successful payment), 4000 0000 0000 3220 (triggers 3D Secure), 4000 0000 0000 0002 (card declined)
- Test the full flow – payment, success redirect, failure handling, email receipts
- Test webhooks – use the Stripe CLI to forward webhook events to your local development environment
- Check mobile – test the payment form on mobile devices. Stripe Elements is responsive by default, but your surrounding layout might not be.
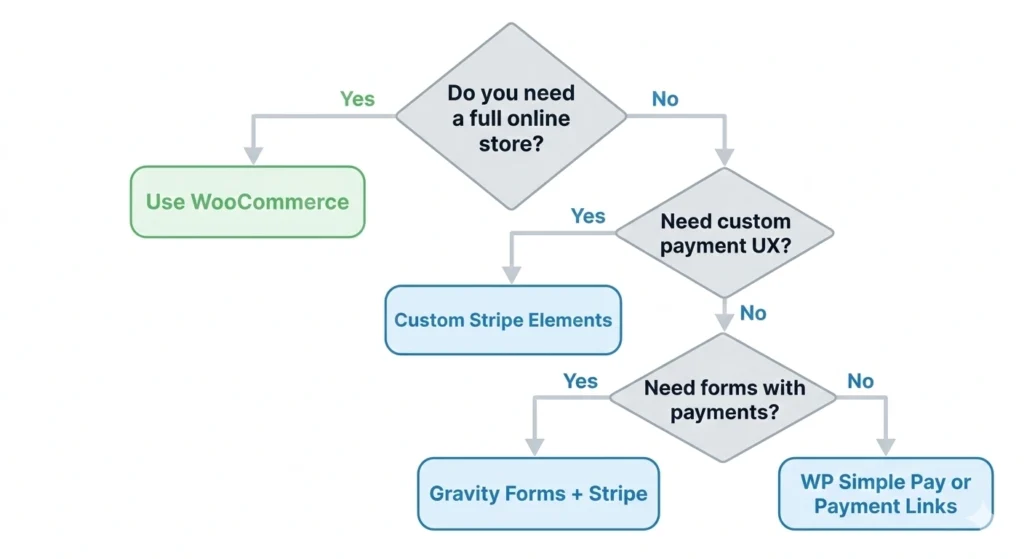
Comparing Your Options
Here is a quick comparison to help you decide:
WP Simple Pay – Best for most WordPress sites. Free or $49+/yr Pro. Low complexity. Medium customisation.
Stripe Payment Links – Simplest possible setup. Free (Stripe fees only). Minimal complexity. Low customisation.
Stripe Elements (Custom) – Best for bespoke builds. Developer time cost. High complexity. Full customisation.
Gravity Forms + Stripe – Best for complex forms with payments. $59+/yr. Medium complexity. Medium customisation.
Common Mistakes to Avoid
- Using WooCommerce “just for payments” – if you do not need a store, do not install one. The overhead is not worth it.
- Storing API keys in the database – use wp-config.php or environment variables instead.
- Skipping test mode – always test with Stripe’s test keys before accepting real money.
- Forgetting webhooks – especially for subscriptions. Without webhooks, your site will not know when a payment fails or a subscription is cancelled.
- Not handling errors gracefully – show clear, helpful messages when payments fail. “Something went wrong” is not good enough.
- Ignoring mobile – over half of web traffic is mobile. If your payment form does not work on a phone, you are losing money.
When You Should Use WooCommerce Instead
To be fair, there are cases where WooCommerce is the right choice even for Stripe payments:
- You are selling multiple products with different prices
- You need inventory management
- You need a shopping cart (customers buying multiple items)
- You need shipping calculations
- You need tax management across multiple regions
If any of these apply, WooCommerce earns its place. For everything else, a direct Stripe integration is cleaner.
For agencies that do need WooCommerce with a better checkout experience, we built Minimal Checkout – a customised Stripe-like checkout for WooCommerce that strips away the bloat and delivers a faster, cleaner payment flow.
Getting Started
Here is your action plan:
- Decide which method fits – use the comparison above
- Sign up for Stripe if you have not already
- Set up in test mode first – always
- Build and test your payment form – on a staging site if possible
- Switch to live keys – only after thorough testing
- Monitor – check Stripe Dashboard regularly for failed payments, disputes, and unusual activity
The beauty of Stripe without WooCommerce is simplicity. Fewer moving parts means fewer things to break, faster page loads, and a cleaner experience for your clients and their customers.